My tired Zosia finally fell asleep and the house became quiet. Out of the window I can see that the winter is not going to let us forget about her, so not for the first time this year, she covered us in snow. It is such a wonderful yet rare winter here… I sat down at the table, got a mug of coffee, and let my eyes wander to the wall. Or more like to one of the things on it. An angel. I know that Christmas has only just been and there are over 300 days to the next! However, this angel is special, because it is homemade using salt dough. I have made a lot of these in the past. At the start, they were not very good, because the salt dough was not as it should be. As I made more, though I made the recipe much better and now the recipe is close to perfect. While I am looking at the angel I think-why not share the recipe with you? Making salt dough things is great fun for both adults and children. Also, who says that you can only make angels out of salt dough? A long time ago, we used salt dough to make different things such as things for dolls, little cups, plates, breads and buns, etc. You can also make beads, brooches, hearts and many, many other things. There are so many times you can give them as gifts to other people; Valentine’s Day, Easter, birthdays and even Mother’s Day. You know how many celebrations there are… You should try it.
Oto mój najlepszy przepis na masę solną;
1 szklanka zwykłej mąki
1 szklanka drobnej soli
1 lub 2 łyżki mąki ziemniaczanej
1 stołowa łyżka kleju do tapet.
Klej należy rozpuścić w niepełnej szklance gorącej wody, potem po napęcznieniu, jeszcze ciepły wlewamy do pozostałych składników i wyrabiamy. Jeśli jednak masa wydaje ci się za mało plastyczna to możesz dodać jeszcze odrobinkę wody.
This is my best recipe for salt dough:
One mug full of plain flour
One mug full of table salt
One or two teaspoons of potato flour (you can also get it in polish shops or just do not add it at all)
1 tablespoon of wallpaper paste
Dissolve the glue in a mug full of hot water, and while it is still hot add it to the rest and knead it. If it does not stick very well, add a little bit more water.
Zabawa gotowa! Podpowiem tylko, że można lepić swoje cuda używając różnych pomocnych rzeczy; jak foremki do ciastek, wyciskacz do czosnku, nożyków, widelcy…… Dobrze jest od razu układać je na blasze do ciasta wysypanej mąką i dopiero wtedy dorabiać i przyklejać małe szczegóły.
Now for the fun part! I will just say that you can use a lot of things to make your own original figures and things such as plastic biscuit cutters, a garlic press, knives, forks… It is good to put a shape in the cake tin covered in flour before you add other bits to it.
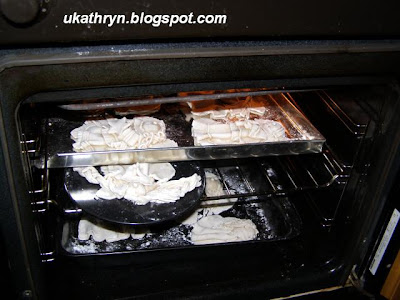
Następnie nasze rzeczy muszą wyschnąć. Najlepiej jak schną na słońcu, ale zimą pomagamy sobie piekarnikiem i co jakiś czas podsuszamy ( nie pieczemy) około 15 -20 minut w temperaturze 50 stopni, przy uchylonych drzwiczkach. I tak kilka razy. Można też wykorzystać kaloryfer. Kiedy całkowicie wyschną( pamiętajcie, że grube rzeczy schną długo) można je pomalować. Ja używam do tego farb akrylowych. Moje dzieciaki malowały plakatówkami. Akryle są trwałe i samo pomalowanie wystarczy lecz jeśli ktoś chce nadać swoim wyrobom blasku, po wyschnięciu farby powinien je polakierować bezbarwnym lakierem, najlepiej w sprayu. Posiadam zaledwie kilka zdjęć moich wyrobów z masy solnej i są to tylko anioły. Oto one:
When you are done, these things need to dry. It is best if you let them dry out in the sun, but in the winter, the oven will do at the temperature of 50°C, with the oven door slightly open for 15-20 minutes. Repeat this a few times. You may also use a radiator. When they are completely dry (remember that thick objects do not dry as fast as thin ones), you may paint them. I use acrylic paints for that. My children used poster paints. Acrylic paints last much longer and if you want to give it a little shine, you can cover them with clear varnish, especially if it is spray. From the photos that I have, I chose the ones that show some of my salt dough creations.


świetne anielice! te pulchne podobaja mi się najbardziej :P
OdpowiedzUsuńZapraszam do siebie po wyróżnienie :)
Przecudne, uduchowione anielice:) Aż szkoda, że nie masz więcej zdjęć, ale te są naprawdę piękne:)) Agata
OdpowiedzUsuńPrzecudne :-) jestes prawdziwa artystką Kasiu - Renata
OdpowiedzUsuńDziękuję za podzielenie się przepisem. Jestem pod dużym wrażeniem Twoich prac. Przecudne te aniołki!
OdpowiedzUsuńCieszę się, że trafiłaś do mnie, a ja trafiłam do ciebie, zobaczyłam piękne rzeczy i cudne dzieciątko:)Dziękuję za miłe słowa i cieplutko pozdrawiam w ten zimowy czas!
OdpowiedzUsuńmarta z cafe-szydelko
ale pięknie :) to prawdziwe dzieła sztuki - będę zaglądać :) pozdrawiam
OdpowiedzUsuńUroczy blog, dziękuję za odwiedziny u mnie. Będę tutaj z przyjemnością zaglądać. Pozdrawiam w ten zimowy wieczór.
OdpowiedzUsuńBardzo ładne są Twoje aniołki:)Ja kiedyś pracowałam przy produkcji z masy solnej i też to były w większości aniołki. Bardzo miło wspominam tamten okres:) Może kiedyś też się skuszę, aby zrobić coś z masy solnej:)
OdpowiedzUsuńThese are neat! You're so creative:)
OdpowiedzUsuńThanks!I try the best!
OdpowiedzUsuńОчень понравились ангелочки, хотела бы иметь такого у себя!!!))) сожалею, что не могу прочитать текст, нет переводчика(((
OdpowiedzUsuńу тебя есть возможность его установить?
Очень понравилсь все твои работы - вязание чудесное!
Irina -look at the very bottom. There is a translator -especially for you!
OdpowiedzUsuńSą niesamowite!
OdpowiedzUsuń